

-
By:
- MathBomb
- No comment
Getting Set Up for RAS locally
Hello! If you’re here then you’re going to be one of the few who will be able to access the Relative Athletic Score database for more than just searching and pulling cards. You’ll be able to download the whole thing, as it stands today, and query against it in any way you see fit. You’ll be learning how to use SQL to do these queries, bu it’s set up in such a way that you can export the data from those queries in other formats if you’d like.
As you’d expect, you will not be allowed to share this database. Prior to receiving the data itself, you’ll be asked to sign an NDA that states as much. You will, however, be able to share the results of many of your queries in any way you see fit, provided that does not mean sharing the underlying data itself. We can get more into the minutiae of that later, but for now let’s just get you set up to create and query your own database locally.
First, you’ll need to download two programs, both free. Microsoft SQL Server Developer edition, which you can download here, and Visual Studio Code, which you can download here. If you’re on a PC, that’s all you’ll need to download. If you’re on a Mac, you will also need Docker. As I do not have a Mac myself, I do not know that process, but I’ve been told that it is easy and intuitive. We can walk through any of these steps if you get stuck.
After downloading MSSQL, you’ll need to install it. This will require you to set it up as basically as you can. There’s no need to select any special options or set anything up manually, you’ll never even need to open any of MSSQL programs that you downloaded. It basically just has to exist and be installed.
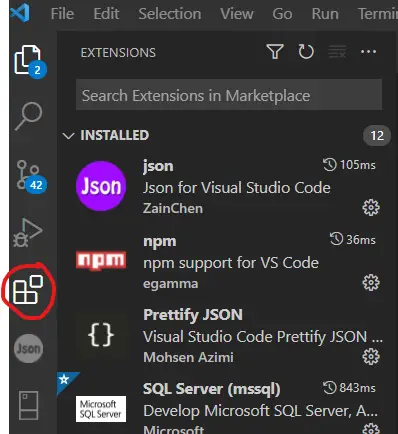
After downloading and installing Visual Studio Code, you’ll need to enable the MSSQL extension within it. You can do this by clicking the extensions marketplace, circled here:

Then searching for MSSQL.
Once found, you’ll just have to install the single extension shown:


There are other SQL extensions and tools that you may want to use later, but none are required now so let’s not get ahead of ourselves.
Once you’ve got this set up, you should see the SQL server button shown here:


If you don’t see the button, VS Code may require you to restart the program. NOTE: You will not see localhost, shown in this screenshot, just yet. That’s okay, we’ll get there.
Next, you’ll click on the add button, circled here.


Next it’ll ask for a database name. You haven’t created one yet, so you can just hit enter here:


And that’s it! You’ve set up VS Code to communicate with MSSQL and given it a connection to use. You’ll be selecting this connection often as it needs to know what ‘database’ you’re talking to, but your SQL section should look like this:


Once you’re all set up, tag me in the setup channel on Discord and we’ll get to the next steps.